sábado, 6 de junio de 2020

Grok-backdoor - Backdoor With Ngrok Tunnel Support


Grok-backdoor is a simple python based backdoor, it uses Ngrok tunnel for the communication. Ngrok-backdoor can generate windows, linux and mac binaries using Pyinstaller.

Disclaimer:
All the code provided on this repository is for educational/research purposes only. Any actions and/or activities related to the material contained within this repository is solely your responsibility. The misuse of the code in this repository can result in criminal charges brought against the persons in question. Author will not be held responsible in the event any criminal charges be brought against any individuals misusing the code in this repository to break the law.

Dependencies:
  • Python 2.7
  • Pyinstaller 3.21
  • python-pip 9.0.1

Installation :
pip install -r requirements.txt

Usage:
You need to register an acccount in ngrok.com to use this backdoor, provide Ngrok authcode while configuring the grok-backdoor. You will see a new tcp tunnel created in Ngrok status panel after the grok-backdoor server execution in victim machine.
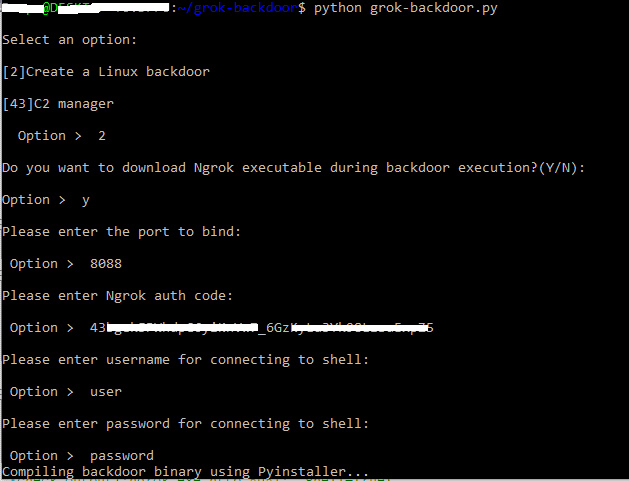
Create backdoor binary by running:
python grok-backdoor.py

Linux:


Windows :


You can find the output binary in grok-backdoor/dist/ directory:


Run grok-backdoor output binary in victim machine and login to Ngrok.com control panel to see the tunnel URL:


Telnet to tunnel URL to get the Bind shell: Enjoy shell :)


Features:
  • Multi platform support(windows,linux,Mac)
  • Autheticated bind shell
  • Ngrok tunnel for communication

Related posts

viernes, 5 de junio de 2020

Goddi (Go Dump Domain Info) - Dumps Active Directory Domain Information


Based on work from Scott Sutherland (@_nullbind), Antti Rantasaari, Eric Gruber (@egru), Will Schroeder (@harmj0y), and the PowerView authors.

Install
Use the executables in the releases section. If you want to build it yourself, make sure that your go environment is setup according to the Go setup doc. The goddi package also uses the below package.
go get gopkg.in/ldap.v2

Windows
Tested on Windows 10 and 8.1 (go1.10 windows/amd64).

Linux
Tested on Kali Linux (go1.10 linux/amd64).
  • umount, mount, and cifs-utils need to be installed for mapping a share for GetGPP
apt-get update
apt-get install -y mount cifs-utils
  • make sure nothing is mounted at /mnt/goddi/
  • make sure to run with sudo

Run
When run, will default to using TLS (tls.Client method) over 636. On Linux, make sure to run with sudo.
  • username: Target user. Required parameter.
  • password: Target user's password. Required parameter.
  • domain: Full domain name. Required parameter.
  • dc: DC to target. Can be either an IP or full hostname. Required parameter.
  • startTLS: Use to StartTLS over 389.
  • unsafe: Use for a plaintext connection.
PS C:\Users\Administrator\Desktop> .\godditest-windows-amd64.exe -username=testuser -password="testpass!" -domain="test.local" -dc="dc.test.local" -unsafe
[i] Begin PLAINTEXT LDAP connection to 'dc.test.local'...
[i] PLAINTEXT LDAP connection to 'dc.test.local' successful...
[i] Begin BIND...
[i] BIND with 'testuser' successful...
[i] Begin dump domain info...
[i] Domain Trusts: 1 found
[i] Domain Controllers: 1 found
[i] Users: 12 found
[*] Warning: keyword 'pass' found!
[*] Warning: keyword 'fall' found!
[i] Domain Admins: 4 users found
[i] Enterprise Admins: 1 users found
[i] Forest Admins: 0 users found
[i] Locked Users: 0 found
[i] Disabled Users: 2 found
[i] Groups: 45 found
[i] Domain Sites: 1 found
[i] Domain Subnets: 0 found
[i] Domain Computers: 17 found
[i] Deligated Users: 0 found
[i] Users with passwords not set to expire: 6 found
[i] Machine Accounts with passwords older than 45 days: 18 found
[i] Domain OUs: 8 found
[i] Domain Account Policy found
[i] Domain GPOs: 7 found
[i] FSMO Roles: 3 found
[i] SPNs: 122 found
[i] LAPS passwords: 0 found
[i] GPP enumeration starting. This can take a bit...
[i] GPP passwords: 7 found
[i] CSVs written to 'csv' directory in C:\Users\Administrator\Desktop
[i] Execution took 1.4217256s...
[i] Exiting...

Functionality
StartTLS and TLS (tls.Client func) connections supported. Connections over TLS are default. All output goes to CSVs and are created in /csv/ in the current working directory. Dumps:
  • Domain users. Also searches Description for keywords and prints to a seperate csv ex. "Password" was found in the domain user description.
  • Users in priveleged user groups (DA, EA, FA).
  • Users with passwords not set to expire.
  • User accounts that have been locked or disabled.
  • Machine accounts with passwords older than 45 days.
  • Domain Computers.
  • Domain Controllers.
  • Sites and Subnets.
  • SPNs and includes csv flag if domain admin (a flag to note SPNs that are DAs in the SPN CSV output).
  • Trusted domain relationships.
  • Domain Groups.
  • Domain OUs.
  • Domain Account Policy.
  • Domain deligation users.
  • Domain GPOs.
  • Domain FSMO roles.
  • LAPS passwords.
  • GPP passwords. On Windows, defaults to mapping Q. If used, will try another mapping until success R, S, etc... On Linux, /mnt/goddi is used.


Related word


Evil Limiter: Taking Control Of Your Network Bandwidth


Ever wanted to block someone from the network or limit their bandwidth without having the network admin privileges? Well Evil Limiter has got you covered then.


An amazing tool to help you control your network without having access to the admin panel.

Today I'm gonna show you how to use this interesting tool to take control of your network.


Requirements:

1. A PC or Laptop with Linux OS.
2. A Network Adapter.
3. Access to the Network you want to control.
4. sudo or root access on your Linux OS.

First of all we will download the tool from its github repository:

https://github.com/bitbrute/evillimiter

You can download and extract the zip file from the link above or you can clone evillimiter repository using git like this:


git clone https://github.com/bitbrute/evillimiter 


Now lets install the downloaded tool on our machine

Step 1: Move inside the downloaded github repository

cd evillimiter


Step 2: To install type


sudo python3 setup.py install


wait for the installation to finish (May take some time)


Step 3: To run type


sudo evilimiter


Voila! That's it, you got it up and running on your machine


Now how do you control your network with it, its very easy.

It should detect your network automatically but yeah you can set it up manually as well using the command line argument -i.

After you have selected the right interface to control, you need to scan your network for live hosts. To perform the scan type


scan


you can pass an optional flag to the scan command which is range which will help you to specify the range of ip addresses you want to scan like this


scan --range 192.168.1.1-192.168.1.100


The above command will scan a total of 100 hosts from 192.168.1.1 to 192.168.1.100


Now after you have scanned your network next thing is to list the hosts that have been discovered during the scan for that you type the hosts command like this


hosts


Now you know the hosts on your network and now you should know which host you wanna block or limit based on the mac address of the host. Remember the host id of the host that you want to block or limit bandwidth of and lets do the magic.

to block a host from using the internet we simply specify the block command followed by the host id of the host that we want to block like this

block 1


if instead of blocking the host we just want to limit his internet bandwidth we can do just that by using the limit command followed by the host id and then the bandwidth that we want to allocate to that particular host like this


limit 1 100kbits


Wohooo! yeah its that easy and yes you can do all this without having the network admin role.

Now if you want to show mercy on that poor guy (blocked host), you can set him free by using the free command followed by the host id like this:

free 1


Well isn't administrating your network bandwidth so easy now.

Hope you enjoyed this tutorial.:)

More articles
  1. Rapid7 Pentest
  2. Pentest With Kali
  3. Pentest With Kali
  4. Pentest Distro
  5. Pentest Nmap
  6. Pentest Firewall
  7. Hackintosh
  8. Pentest Vs Ceh
  9. Pentest Online Course
  10. Hacker Software
  11. Pentest Network
  12. Pentest With Kali
  13. Pentestgeek
  14. Pentest Reporting Tool
  15. Pentest Tools
  16. Pentest Xss
  17. Pentest Kit
  18. What Hacking Is

PKCE: What Can(Not) Be Protected


This post is about PKCE [RFC7636], a protection mechanism for OAuth and OpenIDConnect designed for public clients to detect the authorization code interception attack.
At the beginning of our research, we wrongly believed that PKCE protects mobile and native apps from the so called „App Impersonation" attacks. Considering our ideas and after a short discussion with the authors of the PKCE specification, we found out that PKCE does not address this issue.
In other words, the protection of PKCE can be bypassed on public clients (mobile and native apps) by using a maliciously acting app.

OAuth Code Flow


In Figure 1, we briefly introduce how the OAuth flow works on mobile apps and show show the reason why we do need PKCE.
In our example the user has two apps installed on the mobile phone: an Honest App and an Evil App. We assume that the Evil App is able to register the same handler as the Honest App and thus intercept messages sent to the Honest App. If you are more interested in this issue, you can find more information here [1].

Figure 1: An example of the "authorization code interception" attack on mobile devices. 

Step 1: A user starts the Honest App and initiates the authentication via OpenID Connect or the authorization via OAuth. Consequentially, the Honest App generates an Auth Request containing the OpenID Connect/OAuth parameters: client_id, state, redirect_uri, scope, authorization_grant, nonce, …. 
Step 2: The Browser is called and the Auth Request is sent to the Authorization Server (usually Facebook, Google, …).
  • The Honest App could use a Web View browser. However, the current specification clearly advice to use the operating system's default browser and avoid the usage of Web Views [2]. In addition, Google does not allow the usage of Web View browser since August 2016 [3].
Step 3: We asume that the user is authenticated and he authorizes the access to the requested resources. As a result, the Auth Response containing the code is sent back to the browser.

Step 4: Now, the browser calls the Honest App registered handler. However, the Evil App is registered on this handler too and receives the code.

Step 5: The Evil App sends the stolen code to the Authorization Server and receives the corresponding access_token in step 6. Now, the Evil App can access the authorized ressources.
  • Optionally, in step 5 the App can authenticate on the Authorization Server via client_id, client_secret. Since, Apps are public clients they do not have any protection mechanisms regarding the storage of this information. Thus, an attacker can easy get this information and add it to the Evil App.

    Proof Key for Code Exchange - PKCE (RFC 7636)

    Now, let's see how PKCE does prevent the attack. The basic idea of PKCE is to bind the Auth Request in Step 1 to the code redemption in Step 5. In other words, only the app generated the Auth Request is able to redeem the generated code.


    Figure 2: PKCE - RFC 7636 

    Step 1: The Auth Request is generated as previosly described. Additionally, two parameters are added:
    • The Honest App generates a random string called code_verifier
    • The Honest App computes the code_challenge=SHA-256(code_verifier)
    • The Honest App specifies the challenge_method=SHA256

    Step 2: The Authorization Server receives the Auth Request and binds the code to the received code_challenge and challenge_method.
    • Later in Step 5, the Authorzation Server expects to receive the code_verifier. By comparing the SHA-256(code_verifier) value with the recieved code_challenge, the Authorization Server verifies that the sender of the Auth Request ist the same as the sender of the code.
    Step 3-4: The code leaks again to the Evil App.

    Step 5: Now, Evil App must send the code_verifier together with the code. Unfortunatelly, the App does not have it and is not able to compute it. Thus, it cannot redeem the code.

     PKCE Bypass via App Impersonation

    Again, PKCE binds the Auth Request to the coderedemption.
    The question rises, if an Evil App can build its own Auth Request with its own code_verifier, code_challenge and challenge_method.The short answer is – yes, it can.

    Figure 3: Bypassing PKCE via the App Impersonation attack
    Step 1: The Evil App generates an Auth Request. The Auth Request contains the client_id and redirect_uri of the Honest App. Thus, the User and the Authorization Server cannot recognize that the Evil App initiates this request. 

    Step 2-4: These steps do not deviate from the previous description in Figure 2.

    Step 5: In Step 5 the Evil App sends the code_verifier used for the computation of the code_challenge. Thus, the stolen code can be successfully redeemed and the Evil App receives the access_token and id_token.

    OAuth 2.0 for Native Apps

    The attack cannot be prevented by PKCE. However, the IETF working group is currently working on a Draft describing recommendations for using OAuth 2.0 for native apps.

    References

    Vladislav Mladenov
    Christian Mainka (@CheariX)
    Related posts
    1. Hackintosh
    2. Hacker Ethic
    3. Hacking Websites
    4. Pentest Web Application
    5. Hacker On Computer
    6. Pentest Website
    7. Pentest Bootcamp
    8. Hacking Script
    9. Pentest Bootcamp
    10. Hacking Groups
    11. Pentest With Metasploit
    12. Pentest Azure
    13. Pentest Standard
    14. Pentest Tools Framework
    15. Hacking Gif
    16. Pentest Software
    17. Hacking Growth
    18. Hacking Groups
    19. Hacking With Raspberry Pi

    AutoNSE - Massive NSE (Nmap Scripting Engine) AutoSploit And AutoScanner


    Massive NSE (Nmap Scripting Engine) AutoSploit and AutoScanner. The Nmap Scripting Engine (NSE) is one of Nmap's most powerful and flexible features. It allows users to write (and share) simple scripts (using the Lua programming language ) to automate a wide variety of networking tasks. Those scripts are executed in parallel with the speed and efficiency you expect from Nmap. Users can rely on the growing and diverse set of scripts distributed with Nmap, or write their own to meet custom needs. For more informations https://nmap.org/book/man-nse.html

    Installation
    $ git clone https://github.com/m4ll0k/AutoNSE.git
    $ cd AutoNSE
    $ bash autonse.sh

    Exmaples
    $ bash autonse.sh


    Related word